Automatic Thumbnail and Readmore Function

Readmore function is used to cut our post on homepage, post will appear fully when we click readmore link. You can see my post on homepage. It's cut automatically and if we insert image, it appears thumbnail. This is automatic readmore function with thumbnail. We just need to set up our HTML code. How to?

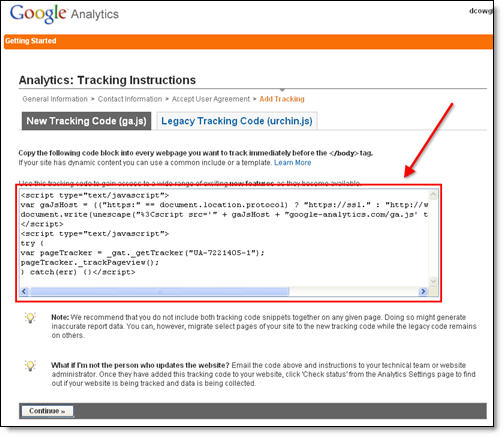
1. Go to "Layout" click "Edit HTML"
2. Tick on "Expand Widget Templates"
3. Find </head> code
4. Insert this javascript under </head> code

<script type='text/javascript'>var thumbnail_mode = "no-float" ;
summary_noimg = 430;
summary_img = 340;
img_thumb_height = 100;
img_thumb_width = 120;
</script>
<script src='http://cebong.ipit.googlepages.com/read-moreotomatis.js' type='text/javascript'/>


Note :

You can cutomize this size

summary_noimg = 430; is post cut height without image
summary_img = 340; is post cut height with image
img_thumb_height = 100; is thumbnail image height
img_thumb_width = 120; is thumbnail image width

5. Find this code

<data:post.body/>


6. Replace with this code below

<b:if cond='data:blog.pageType != "item"'>

<div expr:id='"summary" + data:post.id'><data:post.body/></div>
<script type='text/javascript'>createSummaryAndThumb("summary<data:post.id/>");</script>
<span class='rmlink' style='float:right;padding-top:20px;'><a expr:href='data:post.url'> read more “</a></span>

</b:if>
<b:if cond='data:blog.pageType == "item"'><data:post.body/></b:if>


7. Save


Now you can try to post and it cut automatically.
Read rest of entry

Post your articles via email

Or how to post using mail.yahoo.com or gmail.com ?

1. Login into your blogger account.
2. Click on “Change Settings” icon of your blog.
3. Open ” Email” tab (see picture) -> blogger-how-to.jpg

4. Enter your Secret Mail-to-Blog word (see picture) -> secret.jpg
If you want to publish automatically don’t forget to check it.

5. Click “Save Changes”.
6. Login into your email account, write your post ( email Subject will be post Title and email body will be your post), sent it to
youbloggeraccountname.SECRETWORD@blogger.com.

Read rest of entry

How to Install Google Analytics on Blogger

Google Analytics Blogger LogoWouldn’t it be nice to know how many people actually visited your blog each day? How about knowing which of your posts are the most popular? Well surprisingly Blogger doesn’t currently offer any native blog analytics but fortunately there is Google Analytics — available for free.

Google Analytics is a great tool that will show you all sorts of useful information about how people found your blog, keywords they searched on to find you, where they came from and even how long they stayed. You’ll learn more about where your visitors come from and how they interact with your blog. This is a must tool if you are trying to build a profitable blog otherwise you are flying blind!

This article will show you how to add Google Analytics to your Blogger blog. It’s a fairly simple process and doesn’t require any technical skill at all.

Step #1 - Setup a Google Analytics Account

Go to Google Analytics and sign in using your Blogger login. If your account doesn’t work for some reason, you can create a new one instead. Once you login you’ll see a screen that looks like this:

Google Analytics Blogger Sign Up Step 1

Click on the “Sign Up >>” button and proceed to the next step which will ask you for your general information. Website URL, Account Name, Country, and Time Zone. The screen will look like this:

Google Analytics Blogger Step 2

If you noticed, I just put my Blogger url (without the http://) and called it “David’s Account” because this is your top-level container for 1 or 100 different websites so it’s a good idea to name it something more general. The next step will ask you for your contact information which includes your first name, last name, phone number, and country. Easy so far right? :-)

Google Analytics Blogger Step 3

Your last step in signing up will ask you to accept the user agreement terms and conditions which you should read (just kidding…who actually ever reads these entire legal terms anyhow?).

Google Analytics Blogger Step 4

Now this next screen is very important. This is the code you will need to copy and paste into your blogger template. Go ahead and click into the box and it will automatically highlight the entire block of code for you. Now you need to copy that code and paste it into notepad or into a MS Word document. Save it as you’ll need to use it later.

Google Analytics Blogger Step 5

After you click on the “continue >>” button you will be taken to your brand new Google Analytics dashboard! You will see your blogger blog listed but with no analytical data….yet.

Google Analytics Blogger Dashboard

Ok, now you are done with setting up your Google Analytics account. The next step is placing the tracking code into your Blogger template so it can report back to Google Analytics and provide you with some cool data points.

Step #2 - Adding GA Tracking Code to Your Blogger Template

This is not a very difficult step even if you are afraid to touch your template code. Login to your Blogger account and then click on the “Layout” => “Edit HTML” tabs. This will bring you to the template code. Before you make any changes, I advice you to back up your template just in case there are any problems. After you’ve done so, continue reading.

Now in the edit template html code window, scroll all the way to the bottom of your template code and look for the tag. There should only be one of these closing tags in your template. If you can’t find it then your template wasn’t properly created and you should add one right above the </html> tag.The</html> tag should always be your last line of code in your template. It signifies the end of your template.

Ok, now go back to the code you saved before in a Word Doc from Google Analytics. You are going to copy it and paste it right above the tag as illustrated in the image below. The yellow highlighted code is the new GA code I just pasted into my template.

blogger google analytics code 2

Save your template and you shouldn’t get any error messages. If you do, it’s most likely not related to this GA code and something else with your template itself. Assuming you’ve been successful with your save, you are all done embedding the GA code in your template!

Step #3 - Confirm Google Analytics is Tracking

Go back into your Google Analytics account and look at your dashboard. Most likely you will see a little yellow exclamation mark under the “status” column that looks like this: google analytics tracking not installed. This means everything isn’t working properly yet which is fine because we are about to tell GA we just added the code. From your dashboard, click on the “edit” link which is located to the far right.

Google Analytics Blogger Dashboard Edit

After you click on that link, you’ll see another screen like below. It will say “Tracking Not Installed” followed by a link “Check Status”. You’ll want to go ahead and click on that link which will tell GA to visit your site and look for the new code you just pasted in your template.

Google Analytics Blogger Dashboard Check Code

Assuming you pasted the code in there as instructed above, GA will find the new code and begin tracking everything on your blog. If you are still having problems, it’s most likely something to do with GA and you should read their help guide to troubleshoot your problem.

Google Analytics Blogger Dashboard Success

The message seen here, “Waiting for Data” means you have correctly setup GA and data is being gathered! Click on the top left Google Analytics logo and it will take you back to your dashboard. From there click on the “View report” link and that’s where all your very important Blogger visitor data will start appearing!

Google Analytics Blogger Dashboard Results

Now it usually takes an hour or so before you will see any data (maybe longer if you don’t get much traffic to your blog) so please be patient. Trust me, you’ll be logging in at least once a day just to see how much traffic your blog is getting. It’s very addicting and powerful information to learn from. You’ll be surprised which posts are your most popular and what countries people are coming from to read your blog.

Google Analytics is very powerful and we have just learned how to install it into your Blogger template. We haven’t even scratched the surface on the features and reporting it can do. For most Bloggers, this will be enough. Data will be collected and you will just review it. Others with more in-depth goals (like selling products or services, creating a sales funnel, etc) will want to spend more time learning GA. Hope you enjoyed the tutorial and don’t blame me for your new found addiction!

Read rest of entry

Blogger Update Breaks Page Element Layout Editor

Last night (Feb 12th, 2008) the Blogger/Blogspot engineering team at Google released a patch with a few updates and bugs fixes which apparently did more harm than good. There are numerous reports in the Blogger Help Group of people having problems with their page element layout editor not working properly.

Update (2/15/08): Blogger has acknowledged the scrollbar problem as a known issue but has not given an eta on a fix. They did recommend template designers use the body#layout CSS selector to add CSS styles that adapt templates to the editor which is a good idea. I’ve listed some css code below you can use if you want to add and tweak it for your template. You can also read more about it here.

I noticed this myself when I was trying to test and add a new custom xml Blogger template. With some custom templates, the overall width of the actual template is larger than the max 750px template editor window so you would typically have to scroll to the right to be able to edit widgets or page elements. If you look at the screen shot below, you’ll see what I’m talking about.

missing-scrollbar.png

So how are you supposed to edit your sidebar page elements if you can’t even get to the “edit” link on each one? Well, luckily I discovered a workaround which will allow you to get to each buried page element. The template window is actually an iframe which means it’s a window within a window. Knowing this, you are able to scroll within this window even though the scrollbar is not physically visible.

Just click anywhere within the template window and hold down your mouse button. Keeping your mouse button held down, move your mouse as far right as you can. If you do it correctly, you’ll notice it moves the template window to the right and you can now see your “edit” links.

missing-scrollbar2.png

According to their official Blogger Buzz blog, this is a list of the updates made in this release. They probably didn’t realize this release would cause more harm than good but since the Blogspot team is pretty good about listening to feedback, I bet it’s only a matter of time before they fix this bug. They should also make the Blogger page element layout window bigger than 750px. I’d recommend they make it fluid width so it expands depending on the template size being used. Do they not realize the huge demand and usage of custom blogger templates which by nature are wider and better?

Anyhow, here’s a list of the updates announced with this release:

  • Clearer identity options on the comment form (can use OpenID)
  • Transliteration is now available in Kannada, Malayalam, Tamil, and Telugu as well as Hindi
  • Posts with more than 200 comments have them split across multiple pages
  • Layouts blogs now have a “Layouts” tab instead of “Template”

They also addressed a few bugs which seem pretty minor to me except for the “Faster loading times in the post editor”. Nevertheless, any bug fixes are good.

  • Better Persian translations and other BiDi layout fixes
  • A fix to the long-standing incorrect label counts bug
  • Safari 3 support for the Layouts template editor pages
  • Faster loading times for the post editor
  • Improved international support in the post editor’s date and time fields
  • Compatibility fixes for Picasa’s BlogThis! button

If you’re really advantageous and want to correctly fix your template, you’ll need to edit and add and tweak the following new .css elements. These elements actually control the Blogger layout frame so it will shrink the widgets so they properly fit.

This set is for a three column template so if you only have two then just delete the left-sidebar-wrapper element. Your template div ids might be named differently so you’ll need to make sure the names are consistent otherwise it won’t work properly.

body#layout #outer-wrapper {
width: 750px;
margin-left: auto;
margin-right: auto;
}

body#layout #header-wrapper {
margin-left: 0px;
margin-right: 0px;
width: 740px;
}

body#layout #main-wrapper {
margin-left: 0px;
margin-right: 0px;
width: 400px;
padding: 0 0 0 0;
}

body#layout #sidebar-wrapper {
margin-left: 0px;
margin-right: 0px;
width: 160px;
padding: 0 0 0 0px;
}

body#layout #left-sidebar-wrapper {
margin-left: 0px;
margin-right: 0px;
width: 160px;
padding: 0 0 0 0;
}

body#layout #footer {
width:600px;
margin:0 auto;
padding-top:15px;
}

Hopefully this will help you and fix your Blogger template so the layout editor shows all your widgets properly. I plan on adding this code to any new templates going forward so it’s not a problem for you!

Read rest of entry

Improve Your Google Rankings in One Easy Step

seo your website
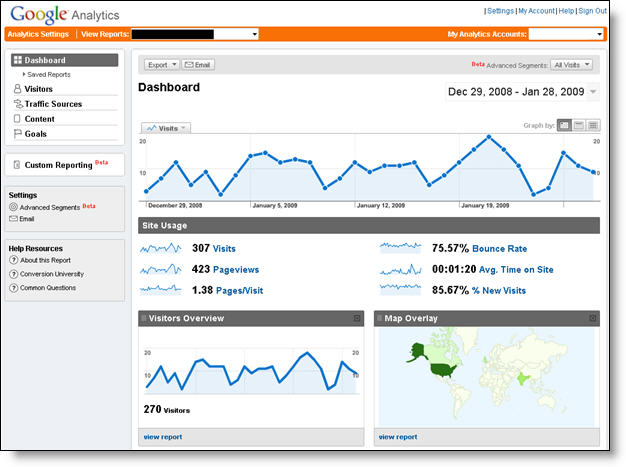
Having a top rank in Google is the holy grail for anyone who has a website. Organic Google traffic is free advertising and how most bloggers (especially those just starting out) achieve visitors and traffic to their site. It all comes down to a simple numbers game. Essentially, more traffic = more money-making opportunities from your blog. The question is, how do you get ranked higher for my blog posts using Blogger?

Before I tell you how, let me give you a quick lesson is search engine optimization (aka SEO). There are two main components: “off-page” and “on-page” optimization. “Off-page” SEO refers to tactics such as link building. The more websites that point their links to your blog/website, the better. It’s a democratic way of showing Google that your site must be important if lots of people are pointing to it. Even more important with “off-page” inbound links is the actual link text (anchor text) that is used to point to your site.

Here’s my proof. If you search Google for the term “click here” you’ll see that Adobe Reader and Apple’s Quicktime software are in the top 3 results. Why? Because so many other sites are linking to these two sites with “click here” as the anchor text to download their software. That’s the power of “off-page” SEO which you as a blogger can’t do much about besides writing such great unique content that generates lots of links.

So with “on-page” SEO you have complete control over how well you’re optimized for Google. This includes keywords in your post titles, title tags, using header tags (h1, h2) and other tactics. Now the one we’re going to focus on in this article is the blog title tag.

Title tags are one of the most (if not the most) important “on-page” elements to ranking high in Google. Search engines such as Google weigh the importance of each word in the title from left to right. So ideally you want your blog post title all the way to the left and your actual blog name to the right. Below is a perfect example of how this should look. You can also check out our Premium Revolution Template which is currently using this technique as well.

blogger seo title

Blogger templates by default don’t come with search engine optimized (SEO) title tags meaning you aren’t maximizing your blog to rank better in Google. If you take a look at your existing Blogger title you’ll see that blogger displays the blog name first then followed by your post title. They have it backwards so let’s get your blog setup properly.

We’re going to have to make a quick edit to your Blogger template which might intimidate some of you but it’s very small and painless. All I ask you to do first is to backup your template just in case you make a boo boo. That makes it easy to revert back without much headache.

Step #1

In your Blogger dashboard, go to “Layout” => “Edit HTML”.

Step #2

In the template code, do a search for this: <title>. It’s usually in the first 5-10 lines of code in your template near the top.

Step #3

Replace that bit of code with the following code:

<data:blog.title/>

<data:blog.pageName/> | <data:blog.title/>

Step #4

Save your template and go back to your blog. Click into any individual post and look at the page title.

All your blogger posts are now much better optimized to rank higher in Google. I’m not going to promise you a night and day difference but you’ve taken a step in the right direction. Now just go post unique high quality content so people searching Google will find your blog first!

Ready to super charge your blog? Check out our professional premium blogger templates or make money by joining our blog affiliate program!

If you like this post then please consider subscribing to our eBlog Templates RSS feed. You can also subscribe by email and have new templates and articles sent directly to your inbox.

Read rest of entry

How to Setup Your Recent Posts and Recent Comments Blogger Page Elements

In order to enable the Recent Posts and Recent Comments page elements in your recently downloaded Blogger template, you need to follow a couple simple steps.

These lists aren’t going to show up when you first install the template so we’re going to bring them to life now. They are actually both RSS Feed widgets so we’ll need to paste in your feed and comment rss feeds to make them work.

Let’s start with the Recent Posts page element so click to edit it. Then paste in your RSS feed url which will most likely be in this format http://YOURSITE.blogspot.com/feeds/posts/default . Make sure to replace “YOURSITE” with your actual blog url.

recent-posts-feed.gif

There’s no need to change the title (unless you want to call it something else) so then hit “Save Changes”. Then save your blogger layout and go over to your other browser window, refresh and see the Recent Posts appear in your blog’s sidebar.

Now you’re going to do the exact same thing with the “Recent Comments” page element but you’ll instead use this feed format http://YOURSITE.blogspot.com/feeds/comments/default . Again, make sure to replace “YOURSITE” with your actual blog url. Save and make sure it’s working properly. If it doesn’t appear on your blog, chances are you don’t have the correct feed url or you might not have any comments yet.

If you really want to fine tune your Recent Posts and Comments settings like increasing the max number displayed to 10 you can. Go read our advanced recent posts settings article and take your widgets to another level.

Ready to super charge your blog? Check out our professional premium blogger templates or make money by joining our blog affiliate program!

If you like this post then please consider subscribing to our eBlog Templates RSS feed. You can also subscribe by email and have new templates and articles sent directly to your inbox.

Read rest of entry

How to Customize a Blogger Template

blog design

Even though I would consider myself a “Blogging Pro” I don’t think I could ever have the patience to design and build a Blogger template from scratch. I’m certainly capable of doing it but the amount of time and effort for me to do it just wouldn’t be worth my time.

Now just to get things straight — I’m not a designer so it’s not my passion. I’d rather be building or working with blogging technology than designing. I have a lot of respect for website and blog template designers and you would too if you’ve ever tried to create one yourself.

It’s almost an art because you have to first have an artistic ability and understand how to balance out designs, etc. Then you need experience in a design software package like Photoshop CS3 or Adobe Illustrator. After that you need to take the .psd and convert it into .css, html, and images for the blog template!

I bet you didn’t even realize the amount of work that goes into building the Blogger templates you are so quick to download and install. Maybe you’ll have more appreciation for the next template you download and install. :-)

So after all my talk about the difficulty and time it takes to create a Blogger template I’m going to give you a great site that will make it easy for you to modify your blog template.

How many times have you downloaded a template that’s “almost” perfect? You wish you could change the header image, adjust the font, or add a background image but you just didn’t know how to. Well, thanks to Amanda over at Blogger Buster, she gives you a cheats’ guide on how to customize your blogger template. Her tutorial isn’t really meant for professional designers but rather those like yourselves who wish to change the look of their blog. In other words, I’d say it’s perfect for you!

The article is part of a series called “Why your blog design needs to be unique!” which is a great read. I’d subscribe to her rss feed as well so you are able to get the latest posts about blogging design tips and tricks. Great work over there Amanda….I enjoy your posts and I’m sure my readers will as well!

Ready to super charge your blog? Check out our professional premium blogger templates or make money by joining our blog affiliate program!

If you like this post then please consider subscribing to our eBlog Templates RSS feed. You can also subscribe by email and have new templates and articles sent directly to your inbox.

Read rest of entry

Add Different Meta Tags To Different Blogger Posts

A lot of you asked on how to add separate META Tags to some of your Blogger posts. We found the solution to your question!

Here it goes.

  1. Switch to the Edit HTML tab of your template and find this line:

    <b:include data='blog' name='all-head-content'/>

  2. Add this code just below that line:

    <b:if cond='data:blog.url == "http://YOUR-BLOG-URL.com/"'>
    <meta content='DESCRIPTION' name='description'/>
    <meta content='KEYWORDS' name='keywords'/>
    </b:if>

    This was done to add META Tags to the main page of the blog.

  3. Now add this code just below the code you add just now:

    <b:if cond='data:blog.url == "http://YOUR-BLOG-URL.com/2008/08/bla-bla-bla.html"'>
    <meta content='Type you post description here.' name='description'/>
    <meta content='Type, the, post, keywords, here' name='keywords'/>
    </b:if>

    Replace http://YOUR-BLOG-URL.com/2008/08/bla-bla-bla.html with the URL of the specific post you want to change the META Tags of.

  4. Repeat Step 3 for as many blog posts you want to have unique META Tags for.
Read rest of entry

Blogger Hacks- How To Put Label Cloud Or Tag Cloud On Blogger Sidebar

To Put Label cloud or tag cloud on yours blogger sidebar template you have to follow below instruction carefully and with free mind :) This hack will really add flavour to your blogger Template and help yours readers in finding contents according to label or tags ,this features will really make you free to add many tags according to your blog post.Make sure you backup your template before making any changes!

  • Log in to your Blogger account
  • On yours Dashboard Select Layout

  • Note-You have a Label widget already Installed In your blogspot webpage where you want it (it can be moved around later)

  • Go To Edit Html
  • Then Search for the code ]]> And Place Below Code In place of ]]>(By Removing ]]>)
  • Click Here To Get The Code :)
  • Now Save Template and Search for below mention label widget in blogger Html
  • Atlast replace the above mention Label1 widget code with below code
  • Click Here To Get The Code :)

    And you are Done :) ,In Case Of Any problem fell free to post yours problems in Comment
Read rest of entry

Here is how to add meta tags to your blogger(blogspot)

1.Sign in to your blogger dashboard>click the 'layout' button[see the screenshot below]
click on the 'layout' link
2.Click on the 'Edit html' tab
click on the 'edit html' tab

Here is the code you have to add
<meta content='DESCRIPTION HERE' name='description'/>
<meta content='KEYWORDS HERE' name='keywords'/>
<meta content='AUTHOR NAME HERE' name='author'/>
DESCRIPTION HERE:Write your blog description
KEYWORDS:Write the keywords of your blog
AUTHOR NAME:Write the author's name(Your name)

3.Add the above code just after this
<b:include data='blog' name='all-head-content'/>

Don't forget to add description and keywords.
and save the changes.
Read rest of entry
 

WEB CREATION Copyright © 2009 Blog is Designed by Suvanno Tharu Sponsored by Hitsweb Pvt.Ltd