How to Peel over page effect in blogger

You may have before seen a peel over effect on some proffessional website and not knew how to get that on your blog this post will help you get that on your Blog
you may use it to shoe advts ,rss feeds or whaterer you want and link it too

Here is the hack to do so..
just follow the steps they are short and sweet
Just login to Blogger,
Go To Layout > Edit Html > Press Ctrl + F[find]

Now place these codes above it
<style type='text/css'>
img { behavior: url(iepngfix.htc) }
#pageflip {
position: relative;
right: 0; top: 0;
float: right;
}
#pageflip img {
width: 50px; height: 52px;
z-index: 99;
position: absolute;
right: 0; top: 0;
-ms-interpolation-mode: bicubic;
}
#pageflip .msg_block {
width: 50px; height: 50px;
overflow: hidden;
position: absolute;
right: 0; top: 0;
background: url(http://www.astro.wisc.edu/~townsend/resource/news/rss.jpg) no-repeat right top;
}
</style>

<script src='http://code.jquery.com/jquery-latest.js' type='text/javascript'/>
<script type='text/javascript'>
$(document).ready(function(){

//Page Flip on hover

$("#pageflip").hover(function() {
$("#pageflip img , .msg_block").stop()
.animate({
width: '307px',
height: '319px'
}, 500);
} , function() {
$("#pageflip img").stop()
.animate({
width: '50px',
height: '52px'
}, 220);
$(".msg_block").stop()
.animate({
width: '50px',
height: '50px'
}, 200);
});


});
</script>


Red line is the image you want to show
Now search for


place the following code after it
<div id='pageflip'>
<a href='http://feeds2.feedburner.com/widgetblogger'><img alt=''
src='http://www.wallheaven.com/page_flip.png'/></a>
<div class='msg_block'></div>
</div>
Thats all and you have your peel over image effect, enjoyy and any problem then commentme.....!!!)
Read rest of entry

cool floating icons on ur blog


This would drastically help visitors on your subpages to easily head to your main page or subscribe your rss or even get back to top if your blog post is to long
these icons being floating on the browser catch the visitor's attention easily , following more clicks on the icons.
You first need to add this code in a html/javascript anywhere on your Blog
the code goes as follows

<a style="display:scroll;position:fixed;bottom:5px;right:5px;" href="#" title="Back to Top"><img src="http://www.wj.com.au/pageimage/top.gif"/></a>

<a style="display:scroll;position:fixed;top:5px;right:5px;" href="
http://learn-webcreation.blogspot.com/feeds/posts/default?alt=rss
" title="Subscribe RSS"><img src="http://blog.fluxiom.com/assets/2007/5/2/fluxiom-rss-icon.png"/></a>

<a style="display:scroll;position:fixed;top:5px;left:5px;" href="http://www.learn-webcreation.blogspot.com" title="GO to HOME"><img src="http://www.mintothed.com/images/home_icon_link.jpg"/></a>

The first paragraph of code is for the floating "back to top" dont edit it.
The second paragraph of code is for you RSS feed ; edit the highlighted portion with you feed
URL
your default feed would be
http://YourAwesomeBlogHere.blogspot.com/feeds/posts/default?alt=rss
and

http://www.YourAwesomeBlogHere.com/feeds/posts/default?alt=rss

Third paragraph is for "Home" edit the highlighted portion in 3rd para with your Blog URL
Thats all and you have done!!


please comment me if you like this and if any confusion...........!!!
Thanks
Read rest of entry

put correct meta tags to increase traffic

The default titles of Blogger Post pages are of the form Blog Title + Post Title.
But don't you feel that the Post Title should be given a little more importance on the Post Page? The search results including those on search engines like google and yahoo use these titles.So it is always better to keep your title more related to your post content.

So here we are going to tweak the Blog's title tag in post pages..Here is a hack that will change the title to the following attractive format Post Title + Blog Title This trick will help you to optimize the blog title for Search Engines like google yahoo, live bing and others.
I am damn sure that this trick will increase your site's visitor count.. It will take a while for the Formatted titles to appear in search results(will appear when it is reindexed by the corresponding search engine).


1.Login to your blogger account
2.From your Dashboard opt for Layout
3.Now choose Edit Html
4.You will see your template code there.
5.In that template code find

<title><data:blog.pageTitle/></title>

and replace it with

<!-- Start www.learn-webcreation.blogspot.com: Changing the Blogger Title Tag -->
<b:if cond='data:blog.url == data:blog.homepageUrl'>
<title><data:blog.pageTitle/></title>
<b:else/>
<title><data:blog.pageName/> ~ <data:blog.title/></title>
</b:if>
<!-- End www.learn-webcreation.blogspot.com: Changing the Blogger Title Tag -->

6.Now SaveTemplate.
7.Affter saving the template take a look at your blog post pages and your will notice the change in title's in your browser's title bar.
Read rest of entry

One more Idea to put different meta tag for different post

Meta descriptions for your web pages can improve the chances of your site being found and clicked on. For those of you who tried adding such descriptions or keywords to your Blogger pages, you might have noticed there's no easy way of doing that.

This article describes the workaround I found for this problem and is a follow-up to the discussions posted here:

About the solutions mentioned in the articles above:

  1. If you add a "constant" meta tag to your Blogger template (as described in the first article), all your pages will have the same description and keywords. This defeats the purpose of this optimization effort and you'll have to go with the solution from the second link. However...

  2. The JackBook Dot Com code seems to be a bit outdated and using it might cause one of the following problems:

    • 404 error when trying to view any of your web pages, or...

    • The blog is displayed correctly, but the description and keywords are not seen by any meta analyzers.

Here are the changes you have to apply to your template in order for the descriptions to work correctly:

  1. Open the Layout panel of your blog and go to Edit HTML.

  2. Click the Download Full Template link and save a backup copy of your current template so you can undo the following changes in case anything goes wrong.

  3. Locate the following lines of code:
  4. <head>
  5. Add the following code immediately after the line:

  6. Replace the http://learn-webcreation.blogspot.com/ line with the URL of your homepage.

  7. Replace the word DESCRIPTION with a description for your homepage.

  8. Replace the word KEYWORDS with a list of keywords separated by commas and relevant for your homepage.

  9. Now, for each individual page from your blog you'll need to follow steps 4-7 again, but adding corresponding URL's, descriptions and keywords. For example, if your first article is about your pet, what you'll need to do next is...

  10. Add this code again immediately after the line:

  11. Replace the http://learn-webcreation.blogspot.com/ line with http://learn-webcreation.blogspot.com/2008/03/my_pet this_is_an_example.html.

  12. Replace the word DESCRIPTION with a description of my pet.

  13. Replace the word KEYWORDS with pet,dog,dog_name.

  14. After adding code for all of your pages, save the template and check if it's doing what it's supposed to.

Read rest of entry

How To Put Bookmarks Under Each Blogger Post.

I found a new way to put a bookmark under each post in blogger. And i think this is pretty neat.All you have to do are the following guides below.

1. log in to your blogger account.
2.Click layout and edit html.
3.Check the expand widget.
4.Click Ctrl and F and paste the code below

and copy the code below and put it under the code in step 4 .Enjoy!!!


Read rest of entry

How to Add a "Share This in Google Reader" Button to Your Blogger Posts

Wouldn't it be great if you could add a button to every post that would make it easy for your visitors to share your posts with their friends in Google Reader, even if they don't subscribe to your feed?

The following is instructions to do just that, for Blogger layout based blogs. (Blogger Classic, Wordpress, and basic static HTML page instructions will be posted soon.)

This will require you to edit the HTML of your template. While I have tried to make this as easy as possible, those that don't feel comfortable with this, should not try it.

The button will only show on post pages and not the main page of your blog. It's not wise to do this any other way, as the URL that will be supplied in Google Reader will be the URL of the page in which your button is clicked. If it is on the main page, the post may not be there when someone reads the entry in someone's shared items, and it is likely not to win you any new loyal readers, so use this only on post pages.

I have also added some comments in the code that will make it much easier for you to add addional buttons in the future, and have them appear on all pages or just post pages.

1. On your Blogger Dashboard, click the Layout link for the blog you want to add the button to.

2. At the top of the Layout page, click the link for Edit HTML.

3. Where it says "Backup/Restore Template", click the link that says "Download Full Template" and save the .xml file to your hard drive. This file will help you restore your template, in case anything goes wrong.

4. In the "Edit Template" section, check the box at the top right that says "Expand Widget Templates".

5. Use your browser's search function to find this line:

<div class='post-footer'>

6. Find the 2 lines in your template that look like this:


<div class='post-footer'>

<p class='post-footer-line post-footer-line-1'>

7. Copy and paste the following code between those 2 lines:


<!-- Footer Button Codes BEGIN -->

<div>

<p>

<!-- things placed after this line will show on all pages -->


<b:if cond='data:blog.pageType == "item"'>

<!-- things placed after this line will only show on post pages -->


<a href='javascript:var%20b=document.body;var%20GR________bookmarklet_domain="http://www.google.com";if(b&&!document.xmlVersion){void(z=document.createElement("script"));void(z.src="http://www.google.com/reader/ui/link-bookmarklet.js");void(b.appendChild(z));}else{}'>

<img alt='Share this in Google Reader' border='0' src='http://appsapps.info/blog/blogspot-layouts/gr-small.png'/>
</a>

<!-- Google Reader Share Item Button END -->

<!-- Do Not Paste Any Code Below This Line -->

</b:if>

</span>


</div>

<!-- Footer Button Codes END -->


8. Click the button at the bottom of the page that says "Save Template".

If you get any red errors, leave a comment stating the specific error message, and I will try to help you out. If you get any errors beginning with "bX-", just try again tomorrow. Sometimes Blogger has issues with itself and waiting a bit can resolve them.

9. Look at your blog. If you have done this correctly, the button should appear on post pages only, and not the main page. Test the button by clicking it on a post and sharing one of your posts in Google Reader.

10. If you would like to add other buttons to the footer of your posts, the comments in the code will help you decide where to put your button codes. One place will show on all pages, and the other will only show on post pages.

11. If you would like a larger button than the one that shows when you use this code, find the word "small" in the file name of the image URL used, and replace it with "large".
Read rest of entry

How to Create 'Read More' link

Did you ever wonder how to cut down lengthy article? See, you got here a 300 word essay, which you publish in your frontpage; but readers get bored easily reading that post. Does this problem got any solution? Luckily, the answer is no other than a 'yes'. You could cut down your essay into a short 2 to 3 paragraph by utilizing the 'Read more...' link. Here's how you do it.

First, you need to know that you are facing the dreaded html editing, but I will make this as simple as I can. Ok, let's get started.

Open your Dashboard and go to 'Layout'. Choose the 'Edit HTML' tab. Find
</head> in the html code. Once you find it, paste the following code right before the </head> tag:
<style>
<b:if cond='data:blog.pageType == "item"'>
span.fullpost {display:inline;}
<b:else/>
span.fullpost {display:none;}
</b:if>
</style>
So it will look like this:
]]></b:skin>
<style>
<b:if cond='data:blog.pageType == "item"'>
span.fullpost {display:inline;}
<b:else/>
span.fullpost {display:none;}
</b:if>
</style></head>

Save the template. Next you need to check the 'Expand widgets' checkbox. Then look for the tag
<data:post.body/>. Once you found it, you need to add the following code right after it:
<b:if cond='data:blog.pageType != "item"'>
<a expr:href='data:post.url' >Read more...</a>
</b:if>
If you do it correctly, your code should look like the this:
<data:post.body><b:if cond='data:blog.pageType != "item"'>
<a expr:href='data:post.url' >Read more...
</b:if>
Ok you are done for the html part. Now moving on to your posts. To cut off lengthy article, type your post like this:
A catchy summary of the article
<span class="fullpost">The lengthy description</span>
The words inside the </span> be replaced by a 'Read more...' link.
Read rest of entry

How to Create Your Own Dreamweaver Shortcuts

It's easy to use the Dreamweaver keyboard shortcuts editor to create your own shortcut keys. And if you create shortcuts to commands and actions that you use all the time, you can improve your efficiency and effectiveness in using this powerful editor.

  1. Select "Keyboard shortcuts..." from the "Edit" menu (Windows) or "Keyboard shortcuts..." from the "Dreamweaver" menu (Macintosh).
  2. Search for the command that you would like to have a keyboard shortcut added to.
  3. Click on the plus icon to add a shortcut to that command.
    Note: you cannot modify the default command set, if you try, Dreamweaver will prompt you to save a copy.
  4. Click in the press key box and click the shortcut command you would like to use.
    Note: If that shortcut command is already in use, Dreamweaver will let you know.
  5. Click OK to save your commands to your own keyboard shortcuts set.
Read rest of entry

Dreamweaver Shortcuts Keys

Keyboard Shortcut Action
Alt+F File
Open the file menu.
Ctrl+N / Cmd+N New document
Open a new document for editing.
Ctrl+O / Cmd+O Open
Open an existing document for editing.
Ctrl+Shift+O / Cmd+Shift+O Open in Frame
Open an existing document into the selected frame for editing.
Ctrl+W / Cmd+W Close
Close the current document. If it has not been saved, you will be prompted to save.
Ctrl+Shift+W / Cmd+Shift+W Close All
Close every open document. If some have not been saved, you will be prompted to save each one.
Ctrl+S / Cmd+S Save
Save the current document. If it has never been saved, you will be prompted for a file name.
Ctrl+Shift+S / Cmd+Shift+S Save As...
Save the current document with a new file name.
Ctrl+P / Cmd+P Print
Print the HTML for the current document.
F12 View in Browser
View the page in your primary Web browser.
Ctrl+F12 / Cmd+F12 View in Alternate Browser
View the page in your alternate Web browser.
Shift+F8 Check Links
Validate the links in the current document.
Shift+F6 Validate Markup
Validate the HTML in the current document.
Ctrl+Q / Cmd+Q Exit
Quit the program and exit.
Alt+E Edit
Open the edit menu.
Ctrl+Z / Cmd+Z Undo
Undo the last change.
Ctrl+Shift+Z / Cmd+Shift+Z Redo
Redo the last undo.
Ctrl+X / Cmd+X Cut
Cut the selected text and put it on the clipboard.
Ctrl+C / Cmd+C Copy
Copy the selected text and put it on the clipboard.
Ctrl+V / Cmd+V Paste
Paste the text on the clipboard at the cursor location.
Ctrl+Shift+C / Cmd+Shift+C Copy HTML
Copy the selected HTML and put it on the clipboard.
Ctrl+Shift+V / Cmd+Shift+V Paste HTML
Paste the HTML on the clipboard at the cursor location.
Ctrl+A / Cmd+A Select All
Select all the text in the window.
Ctrl+[ / Cmd+[ Select Parent Tag
Select the containing tag.
Ctrl+] / Cmd+] Select Child Tag
Select the contained tag.
Ctrl+F / Cmd+F Find and Replace
Search within the current document for text and replace it with other text if you choose.
Shift+F3 / Cmd+G Find Selection
Search within the current document for the selected text.
F3 Find Next
Go to the next instance of the searched for string.
Ctrl+G / ? Go to
Go to the line number or character position you specify.
Ctrl+Space / Cmd+Space Show Code Hints
Display any information available on the tag at the cursor.
Ctrl+Shift+> / Cmd+Shift+> Indent
Indent the selected line(s) one tab space.
Ctrl+Shift+< / Cmd+Shift+<< Outdent
Outdent the selected line(s) one tab space.
Ctrl+Shift+' / Cmd+Shift+' Balance Braces
Align the braces.
Ctrl+U / Cmd+U Preferences
Change your preferences for Dreamweaver.
Alt+V View
Open the View menu.
Ctrl+` / Cmd+` Switch Views
Switch between code, design, and code & design views.
F5 Refresh Design View
Reload the markup displayed in the design view.
Ctrl+Shift+H / Cmd+Shift+H Head Content
Display the header content while in design view.
F6 Expanded Tables Mode
View tables expanded.
Ctrl+F6 / Cmd+F6 Layout Mode
View tables in layout mode.
Ctrl+Shift+I / Cmd+Shift+I Hide All Visual Aids
Turn off all visual aids.
Ctrl+Alt+R / Cmd+Opt+R Show All Rulers
Display all rulers on the screen.
Ctrl+Alt+G / Cmd+Opt+G Show Grid
Display grid in design view.
Ctrl+Alt+Shift+G / Cmd+Opt+Shift+G Snap to Grid
Snap elements to grid.
Ctrl+Alt+P / Cmd+Opt+P Play Plugin
Play plugin at cursor.
Ctrl+Alt+X / Cmd+Opt+X Stop Plugin
Stop plugin at cursor.
Ctrl+Alt+Shift+P / Cmd+Opt+Shift+P Play All Plugins
Play all plugins.
Ctrl+Alt+Shift+X / Cmd+Opt+Shift+X Stop All Plugins
Stop all plugins.
F4 Hide Panels
Hide all open panels.
Alt+I Insert
Open the insert menu.
Ctrl+E / Cmd+E Insert Tag
Insert markup tag at cursor.
Ctrl+Alt+I / Cmd+Opt+I Insert Image
Insert image at cursor.
Ctrl+Alt+F / Cmd+Opt+F Insert Flash
Insert Flash animation at cursor.
Ctrl+Alt+D / Cmd+Opt+D Insert Shockwave
Insert Shockwave object at cursor.
Ctrl+Alt+T / Cmd+Opt+T Insert Table
Insert table at cursor.
Ctrl+Alt+A / Cmd+Opt+A Insert Named Anchor
Insert named anchor at cursor.
Shift+Return / Shift+Return Insert Line Break
Insert line break (
) at cursor.
Ctrl+Shift+Space / Cmd+Shift+Space or Option+Space in Design View Non-breaking space
Insert a non-breaking space ( ) at cursor.
Ctrl+Alt+V / Cmd+Opt+V Insert Editable Region
Insert editable region for a template at cursor.
Alt+M Modify
Open the modify menu.
Ctrl+J / Cmd+J Page Properties
Modify the properties for the page.
Ctrl+T / Cmd+T Quick Tag Editor
Add a tag quickly in the design view.
Ctrl+L / Cmd+L Make Link
Make the highlighted object a link.
Ctrl+Shift+L / Cmd+Shift+L Remove Link
Remove link from highlighted object.
Ctrl+Shift+1 / Cmd+Shift+1 Align Left
Align object left.
Ctrl+Shift+3 / Cmd+Shift+3 Align Right
Align object right.
Ctrl+Shift+4 / Cmd+Shift+4 Align Top
Align object at top.
Ctrl+Shift+6 / Cmd+Shift+6 Align Bottom
Align object at bottom.
Ctrl+Alt+Shift+T / Cmd+Opt+Shift+T Add Object to Timeline
Add element to timeline.
Alt+T Text
Open text menu.
Shift+F7 Check Spelling
Check spelling in document.
Alt+C Commands
Open commands menu.
Ctrl+Shift+X / Cmd+Shift+X Start Recording
Record all commands.
Alt+S Site
Open the site menu.
Ctrl+Shift+D / Cmd+Shift+D Get
Get all files on remote site and bring them to local drive.
Ctrl+Alt+Shift+D / Cmd+Opt+Shift+D Check Out
Check out all files on remote site and bring them to local drive.
Ctrl+Shift+U / Cmd+Shift+U Put
Put all files on remote site from local drive.
Ctrl+Alt+Shift+U / Cmd+Opt+Shift+U Check In
Check in all files on local drive and put them on remote site.
Ctrl+F8 / Cmd+F8 Check Links Sitewide
Validate all links on the site.
Alt+W Window
Open the window menu.
Ctrl+F2 / Cmd+F2 Insert Menu
Toggle insert window.
Ctrl+F3 / Cmd+F3 Properties Menu
Toggle properties window.
Shift+F11 CSS Styles
Toggle CSS styles window.
F2 Layers Menu
Toggle layers window.
Shift+F4 Behaviors Menu
Toggle behaviors window.
Shift+F9 Snippets Menu
Toggle snippets window.
Shift+F1 Reference Menu
Toggle reference window.
Ctrl+Shift+F10 / Cmd+Shift+F10 Databases Menu
Toggle databases window.
Ctrl+F10 / Cmd+F10 Bindings Menu
Toggle bindings window.
Ctrl+F9 / Cmd+F9 Server Behavior Menu
Toggle server behavior window.
Ctrl+F7 / Cmd+F7 Components Menu
Toggle components window.
F8 Files Menu
Toggle files window.
F11 Assets Menu
Toggle assets window.
F9 Tag Inspector Menu
Toggle tag inspector window.
F7 Results Menu
Toggle results window.
Shift+F10 History Menu
Toggle history window.
Shift+F2 Frames Menu
Toggle frames window.
F10 Code Inspector Menu
Toggle code inspector window.
Alt+F9 Timelines Menu
Toggle timelines window.
Alt+H Help
Open the help menu.
F1 Using Dreamweaver
Help with using Dreamweaver.
Ctrl+F1 / Cmd+F1 Using ColdFusion
Help with using ColdFusion.
Shift+F1 Reference
Reference help for Dreamweaver.
Read rest of entry

Hidden Programs In Windows Xp

1) Private Character Editor
This program is for designing icons and Characters
click :start
Then :run
type :EUDCEDIT

2) iExpress
This Program is for converting your files to EXECUTABLE files
click : start
Then : run
type : iexpress

3)Disk Cleanup
This program used for cleaning harddisk to offer space
click : start
Then : run
type : cleanmgr

4)Dr Watson
This program Is for repairing problems in Windows
click : start
Then : run
type : drwtsn32

5)Windows Media Player 5.1
Opens the old media player
click : start
Then : run
type : mplay32

Read rest of entry

shortcut tricks for using brouser

Most of the people work on internet, keyboard is mostly used for typing website URL (address) and if your typing speed is good you can save some time but if you know some browser trick you save some more time.

Normal addresses of any website like -
http://www.Bugjee.com

Normally http:// is automatic type every time when your type any website address in address bar / Location bar.

But if you can type automatically www. & .com/.org/.net with simple trick

www.example.com
Type only example in address bar / Location bar then press Ctrl + Enter and you will get www. & .com automatically
Work with – Firefox, opera, Internet Explorer -6, 7, 8, Google Chrome, Safari
www.example.net
Type only example in address bar / Location bar then press Shift + Enter and you will get www. & .net automatically
Work with – Firefox
www.example.org
Type only example in address bar / Location bar then press Ctrl + Shift + Enter and you will get www. & .org automatically
Work with – Firefox
Now you can see that you can save 8 Keystrokes every time when you open one website and in this situation Firefox is best because it also support .org & .net shortcut.
Bookmarks and browser home page is another options for saving some keystrokes.

Do you like this post.??? If yes then comment me ..........Thanks!!!

Read rest of entry

How to block specific website without using any software

You can block any website in windows vista, seven and xp with this small trick. You don’t need any software for it and when you are trying to open any specific website in browser like internet explorer, Firefox, safari, chrome or opera, it does not open.

Follow these instructions-

Browse C:\WINDOWS\system32\drivers\etc\
Find the file named “HOSTS”
Open it in notepad
under “127.0.0.1 local host” and add website like this-

127.0.0.1 www.example.com

127.0.01 example.com

If you want to block example.com, add both line your hosts file because some of the website also open without www.

http://www.example.com

http://example.com

If you don’t edit your file directly in windows vista & seven, first you need to copy your hosts file in other drive( except c drive) and then edit and replace your hosts file with original host file.

You can also understand with this example you can see here when you want to block orkut, add both domain -

www.orkut.com

www.orkut.co.in – it is a default domain for Indian region.

Now check your browser and that site will no longer be accessible.


please comment me on this post thanks..!!!

Read rest of entry

shortcut keys of Firefox

Most of the people run window operating system and the main fact is that they also use internet explorer because internet explorer is a default browser of window os.

I also know that Mostly users of window operating system use internet explorer but some of the people try Firefox and leave again this because addiction of internet explorer look but this is not a good choice where security and time is main things in these days. so Don’t leave Firefox only on this basis where you addict with internet explorer look & graphical design because tone of the features are available and waiting your mouse clicks and you can also customize Firefox according to your desire.

You can also look some other fact if you are a window xp user your internet explorer version 6.xx and this version does not support tab browsing and if I talk my own self today I don’t work without tab browsing which save my thousands of hours which spend on internet.

Internet explorer 7.xx & 8.xx version support tab browsing but why don’t you try Firefox (3.x.x, English (US), Windows (7.1MB))

So why do you try only one time and leave it please try it 10- 20 times and you can find this is a right choice for you and your work which you done with internet every day.

If you are totally new in Firefox you can try Firefox with some of the top shortcut keys which save your internet surfing time and increase your productivity.

Ctrl + T

Open new tab in same window when you want to open new website.

Ctrl + Shift + T

Reopen any tab which accidentally closed or closed by you or undo close tab.

Ctrl +shift + Delete

Clear Private Data Now, When sometimes few site don’t open properly due to some cache & cookies problem but after clear this data you can open website without any problem.

Ctrl + j

You can open your downloaded file quickly with this option.

Ctrl + L

If you open many website this option is more batter except mouse clicks.

Ctrl + F

Every website has own search bar for searching any matter but if you want to search in any webpage (very long page like Wikipedia) this may be helpful for you.

Ctrl + shift + D

You can bookmarks all your open tab in one time with some specific folder, this is good for you when you work on any topic or subject and suddenly go to other place so when you close your Firefox use this shortcut key and Firefox add your all open tab as a bookmarks for you in seconds.

Ctrl +w

You can close your opened tab quickly then mouse click.

Ctrl + +, Ctrl + – Ctrl +0

If you have wide screen monitor and you want to take full utilization of your monitor to maximize your opened web page or your Grandmother/ Grandfather or other person which has weak eye side and don’t read webpage text due to small size of text this option is good for you.

F11

You can maximize your Firefox window size with it and you can more concentrate your opened web page without affecting other opened program & task bar.


please comment me if u like this.......!!! Thanks..!!!

Read rest of entry

Why & how ,Full utilization of Firefox with shortcut keys

Most of the people run window operating system and the main fact is that they also use internet explorer because internet explorer is a default browser of window os.

I also know that Mostly users of window operating system use internet explorer but some of the people try Firefox and leave again this because addiction of internet explorer look but this is not a good choice where security and time is main things in these days. so Don’t leave Firefox only on this basis where you addict with internet explorer look & graphical design because tone of the features are available and waiting your mouse clicks and you can also customize Firefox according to your desire.

You can also look some other fact if you are a window xp user your internet explorer version 6.xx and this version does not support tab browsing and if I talk my own self today I don’t work without tab browsing which save my thousands of hours which spend on internet.

Internet explorer 7.xx & 8.xx version support tab browsing but why don’t you try Firefox (3.x.x, English (US), Windows (7.1MB))

So why do you try only one time and leave it please try it 10- 20 times and you can find this is a right choice for you and your work which you done with internet every day.

If you are totally new in Firefox you can try Firefox with some of the top shortcut keys which save your internet surfing time and increase your productivity.

Ctrl + T

Open new tab in same window when you want to open new website.

Ctrl + Shift + T

Reopen any tab which accidentally closed or closed by you or undo close tab.

Ctrl +shift + Delete

Clear Private Data Now, When sometimes few site don’t open properly due to some cache & cookies problem but after clear this data you can open website without any problem.

Ctrl + j

You can open your downloaded file quickly with this option.

Ctrl + L

If you open many website this option is more batter except mouse clicks.

Ctrl + F

Every website has own search bar for searching any matter but if you want to search in any webpage (very long page like Wikipedia) this may be helpful for you.

Ctrl + shift + D

You can bookmarks all your open tab in one time with some specific folder, this is good for you when you work on any topic or subject and suddenly go to other place so when you close your Firefox use this shortcut key and Firefox add your all open tab as a bookmarks for you in seconds.

Ctrl +w

You can close your opened tab quickly then mouse click.

Ctrl + +, Ctrl + – Ctrl +0

If you have wide screen monitor and you want to take full utilization of your monitor to maximize your opened web page or your Grandmother/ Grandfather or other person which has weak eye side and don’t read webpage text due to small size of text this option is good for you.

F11

You can maximize your Firefox window size with it and you can more concentrate your opened web page without affecting other opened program & task bar.


please comment me if u like this.......!!! Thanks..!!!

Read rest of entry

How To: Format PenDrive With NTFS File Systemin windows xp

When you try to format pendrive in Windows XP, you don’t found NTFS option in format Window. So first active this option in Windows XP, So that you can format your pen drive in NTFS.


Follow these steps to format in NTFS file system
1.Right click My Computer and select Properties.
2.Choose Hardware Tab and select the Device Manager.


3.Click on Disk drives and selects your pen drive.
4.Right click the pen drive icon and select properties.


5.Choose Policies tab and select the “Optimize for Performance” option
6.Click ok


7.Open My Computer
8.Right click pen drive icon and select format.
9.Choose NTFS in the File System dropdown box.


10.Finally Click start and you have done...............!!!

Don't forgetto comment if you like this tricks. Thaks!!!
Read rest of entry

How to Add Recent Posts Widget to Blogger

Widget to Blogger(blogspot) blogs using Feedburner's BuzzBoost service.

Do the following steps:

  1. Sign-in to your feedburner account and select your blog from My Feeds:
    How to Add Recent Posts Widget to Blogger

  2. Click Publicize tab from the top menu:
    How to Add Recent Posts Widget to Blogger

  3. Then select BuzzBoost from the left sidebar:
    How to Add Recent Posts Widget to Blogger

  4. Next you have to chose the number of recent posts you want to show, then select the optional items from the list and click Save:
    How to Add Recent Posts Widget to Blogger

  5. Now you have to Select the widget code from the top box and Copy it:
    How to Add Recent Posts Widget to Blogger

  6. Then go to Blogger Layout Page - click Add a Page Element/Add a Gadget - select HTML/Javascript - then Paste the code and click Save. Finished!


You will see your Recent Posts Widget according to your Template's design and color! Happy Blogging!2 Thumbs Up

Drop Comments!
Read rest of entry

making dropdown menu for blogspot

A blog reader asked (desperate) for a way to create a pull down menu for his posts of recipes. I have got good and bad news for him. The good news is that there is a simple way to get a drop-down menu. Use Drop-down Menu Generator, which I used to generate a script to paste into a HTML/Javascript Page Element. The bad news for me is that the width of the drop down menu is dependent on the description (post title or anchor text) you put for the link to the post. I used it to do a drop-down menu for the posts in this blog: Food, Drinks and Recipe. It is at the top of the main column and will be displayed in the main page as well as the individual post pages (permalinks). I had originally planed to put it in the sidebar, but because the post titles were long, the width of the drop-down menu generated was too wide for the sidebar, so I had to put it above the main column. If you want something similar, you will need to know how to add an extra "Add a Page Element" for the main column.

The bad news for him is that there is only a limited number of posts he can put in the drop-down menu, and I doubt that would be sufficient for his long list of recipes. However, I suppose this drop-down menu can still be useful for making drop-down menus like for blogs, etc.

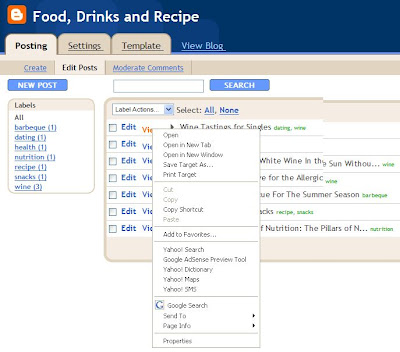
If he is still interested in doing it, this is how to proceed to generate the drop-down menu. For this task, it will be helpful to use a browser like FireFox which have tabbed browsing. In one tab, log into the Blogger account and click "POSTS" for the relevant blog. A page with with a list of posts will appear. Right click on "VIEW" on one of the post and select "Copy Shortcut" to copy the post URL into the clipboard.

Blogger Dashboard with list of posts of a blog

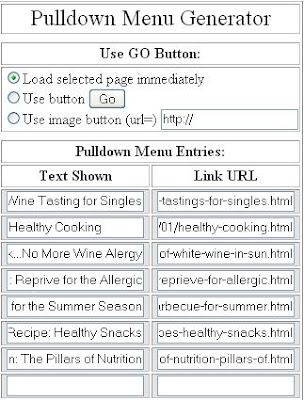
Open another tab and surf over to Drop-down Menu Generator. Paste the URL into the "Link URL" field. Then type the title of the post into the field for "Text shown". Continue the same process until you have entered all the post you want to appear in the drop-down menu, or you run out of fields to paste the Link URL.

Drop-down menu generator

Click on "Generate" and the script will be generated into the window below. Highlight all the script, copy into clipboard, then in the tab for the Blogger account, paste it into a HTML/Javascript "Add a Page Element" window and save.
Read rest of entry

Change background color of New Blogger sidebar

A blogger commented that he could not find the sidebar color code in the template to change the background color of the sidebar. The CSS (Cascading Style Sheet) of every template is written different and if something is missing, all you need to do is to add the relevant missing part in.

For example, in the standard Blogger Scribe template, this is the section in the CSS (Cascading Style Sheet) for the sidebar:

#sidebar {
width:150px;
float:left;
padding:8px 0;
margin:0;
word-wrap: break-word; /* fix for long text breaking sidebar float in IE */
overflow: hidden; /* fix for long non-text content breaking IE sidebar float */
}

There is nothing mentioned about background. So what I did was to add a single line

background: #FFFFFF;

(#FFFFFF is the hexadecimal color code for white) to that section, so that it became:

#sidebar {
width:150px;
float:left;
padding:8px 0;
margin:0;
word-wrap: break-word; /* fix for long text breaking sidebar float in IE */
overflow: hidden; /* fix for long non-text content breaking IE sidebar float */
background: #FFFFFF;
}


BTW, instead of using hexadecimal color codes like #FFFFFF, you can also use most names of colors like red, blue, white, etc. If you want to blend the color to the colors of the site, try typing the search term "colorpic" or "iconico colorpic" into the search box above, tick ( ) Web radio button and search, and I am sure you would see the link as the first result in the SERP (search engine result page) to download a very useful tool I use to get the color code of colors on any website. (I don't want to put too many outbound links as I understand outbound links can lower your PageRank).
Read rest of entry

embed MP3 Files Into your blogspo/website

You have an MP3 file (a podcast, a song of your band, a lecture) and you want to share it with the visitors of your site. You can just put a link to the MP3 and let people download it or you can include it as an object and let the browser play it with a plug-in like QuickTime (and most of the times also crash the browser). Most people want to preview the audio and not wait until it downloads completely. You can play a partial MP3 file in audio player, but many people aren't aware of that.

But there's another away: a Flash player that allows you to pause and rewind the MP3. It's like an audio version of Google Video or YouTube, with the difference that the file is hosted on your server (or on another server). While there are many solutions based on Flash, this is the one I like the most. It's a modified version of Odeo player, that's used to play podcasts on odeo.com:


You just have to replace [MP3 file address] with the actual address.

Here you can see how it looks (in this audio, Marissa Mayer talks about innovation at Google):
Read rest of entry

create your own blogger templete

Software needed : GIMP 2.4.2
What you need: Image Hosting Server to put your image.

OK. This time I'll attempt to show you step by step simple template design for blogger based on my experience.

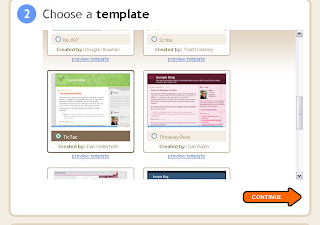
Let's start with changging your standart blogger template to "TicTac".

Are you done yet? if not click Continue button and we can go to the next step (Oh no.. it's gonna be a long article).

Now open your GIMP and create new image with 847 x 500 pixel image size.

Next open layer window (Goto Dialogs --> Layers) and right click background layer and chose Alpha to Selection.

In the editor window Go to Selection panel and chose Shrink and fill with 20 (pixel). Now we have a new rectangle selection area.

Goto Layer panel and chose New Layer named it with A and select Layer FIll Type with Transparency.
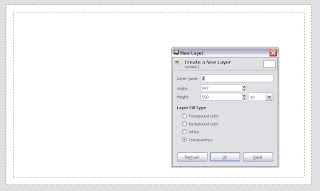

Goto Select panel and chose Rounded Rectangle and select 8. Now fill this selection with white color, in this time you will not see any diferent bicause they have the same color.

OK, to make it diferent let's give this selection a drop shadow.

Goto Filters panel --> Light and Shadow and chose Drop Shadow, Set Offset X and Offset Y to zero (0) , set Blur Radius to 10 and set Opasitas to 60. Now can you see the different?

Still with rounded selected area, go to Selection panel and chose Shrink and fill with 1. We're gonna create a border for body. Now create new layer and name it with B then fill it with White color.

In the layer windows, right click on A Layer and chose Alpha to Selection now fill this area with 858034 color


Now we have a border.

Go to Layer window and right click on Background layer then Chose Alpha to Selection, Create new layer and name it with C. Fill this layer area with e3e79b (it will be your page body color).

Next Goto Tools -> Selection Tools and chose Rectangle Select (Shortcut R). Now create selection area for header (select from upper to down -- 200 pixel height)

Go to Gradient color (Shortcut L), select FG to Transparent and set Foreground color to White, and hold CTRL then fill it from upper to down.

Now we have a White blended header color. Go to Layer window and right click one of the layer then select Flatten Image.

OK, now let's design our logo.

Press CTRL+SHIFT+A to clean any selection area, now select Text Tools (Shortcut T) and set your Font then Click on the header area where you wan to put your logo and write your logo.

Use Move Tools (Shortcut M) for moving the text to any position you like, and if you're done go to Layer window and right click on you logo text layer and chose Alpha to Selection.

Go to to Filters, Light and Shadow and Chose Drop Shadow. Yup.. give the text a shadow, this time set the blur radius to 5.


If you are follow this step by step tutorials then the result would be like those above image.
Go to Layer window, right click one of the Layer and click Flatten image now we are done with designing.

Now let's cut crop image into a several image.

First we need to duplicate our image using CTRL+D, and use Rectangle Select (Shortcut R) to select a header section (200px height) .


Right click this selection area and chose Crop to Selection in Image section. Save our new cropped image and name it with head.jpg.

Go back to master image and select in the middle area with 30px height and full width for main body background image using Rectangle Select and do the same as head image and name it with middle.jpg.
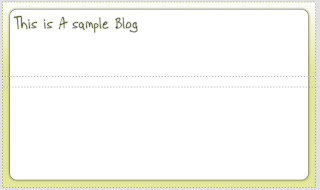

Select about 50px height and full width in the bottom area for our bottom background image and do the same as head, name it with bottom.jpg.


Crop the latest image in the side area full height and about 5px width and do like the other image, name it with side.jpg.
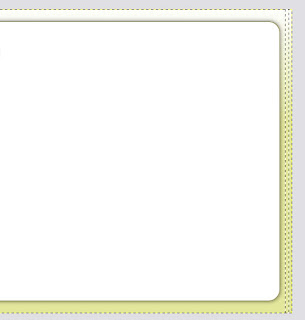
Upload all the 4 image to your Image Hosting server (i.e. photobucket).

Now let's go to our blogger account and select "Edit HTML" in the Template panel (You have to backup your current template before doing this step and do this step at your own risk).

Search for "http://www.blogblog.com/tictac/top_div.gif", remove the color option change it with your http://yourimagehosting/head.jpg, and add height and set it to 200px.
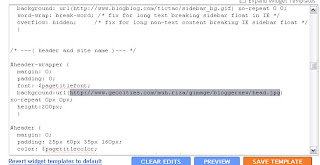

Search and remove for "background: url(http://www.blogblog.com/tictac/top_h1.gif) no-repeat bottom left;".

Search for "http://www.blogblog.com/tictac/tile.gif" and change it with http://yourhostingimage.com/middle.jpg,

Search for "http://www.blogblog.com/tictac/bottom_sash.gif" and change it with http://yourimagehosting.com/bottom.jpg,

Search and remove for "background: url(http://www.blogblog.com/tictac/bottom_sill.gif) no-repeat bottom left;", add background-color and set to #e3e79b;

For the side image we need to create a division (div tag) before the outer-wrapper.

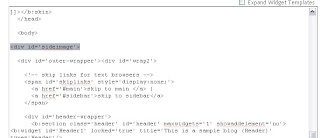
Search for id='outer-wrapper'
and add a div above it and set id='sideimage' (<div id='sideimage'>), next search for "<!-- end outer-wrapper -->" and add a close div (</div>) below it.

Search for "/* ---( layout structure )---*/" and write this code (Note change the image url with yours):

#sideimage {
background:#e3e79b url(http://yourhosingimage.com/side.jpg) repeat-x top;
padding:0;
margin:0;
}


Search and remove for " background: url(http://www.blogblog.com/tictac/sidebar_bg.gif) no-repeat 0 0;".

Preview and it will be look different now, but the title blog are mess up, we'll fix it.

Search for "#header h1" and add "padding:50px 0;", look above it ( padding: 25px 60px 35px 160px;) , change 160px to 40px,

Save it now, next customize your Fonts and Colors and That's it..!

Remember this just a sample background, design your own and publish it using this step.
I Hope this long post can be helpful.
Read rest of entry

how to imbeded IFR3 in blogspot

I try to write a complete steps about sIFR3 like i did to this blog followed with screenshot image on every steps. Remember, you should not implement the following steps on your main blog, create another dummy blog and make it similar enough to your main blog and make sure it's working before putting it on your main blog.

Requirement:
- sIFR3 (download here) and extract to a folder
- Fonts
- At least Macromedia Flash 8 installed on your system
- Free Hosting for sIFR3 files (Geocities or Google Page)
- A dummy blog
- A text editor (notepad++ recommended)

Preparing your font
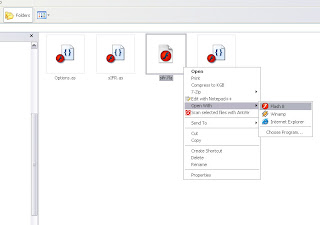
Go to sIFR3 extracted folder, navigate to flash folder and double click on sifr.fla or edit the file using Macromedia Flash 8.


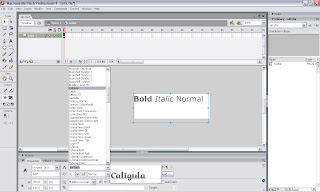
Double click on white area, and you should see text "Bold Italic Normal". Now look down on properties bar and change the font.


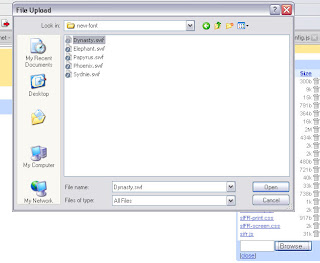
Save your work and then export it as a flash movie and name it the same as the font name. Now go to your hosting account and upload the exported flas file. You can use Yahoo Geocities or Google pages to host your files for free.


Edit and Upload CSS file
In this session you have to now at least basic CSS manipulating skill like padding margin colloring and other basic CSS. Now go to css folder and you should see 2 files on it that is sIFR-print.css and sIFR-screen.css.


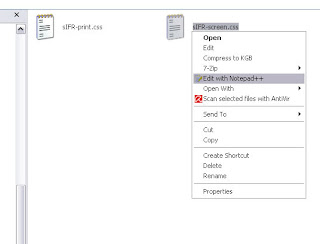
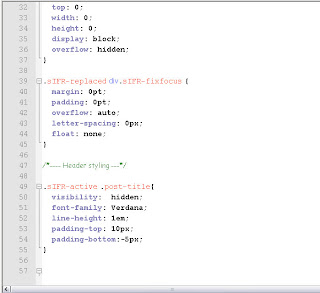
Edit sIFR-screen.css using text editor and scroll down to "---- Header styling ---" line and add the following code bellow those line.

.sIFR-active .post-title{
visibility: hidden;
font-family: Verdana;
line-height: 1em;
padding: 10px 0 0;
}

Look a above code, ".post-title" is class name of Post Title on blogspot. If you want to set sIFR3 on another class just change the class or add another code with different class (You can set sIFR3 to multiple class name).


Upload sIFR-print.css and sIFR-screen.css to hosting server if you're done with editing (You can edit sIFR-screen.css latter directly from your hosting server).

Edit and Upload js File
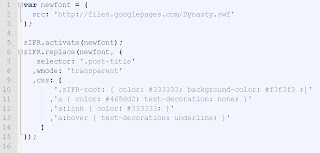
Next go to js folder and you should see 1 folder and 3 js files. Edit sifr-config.js using text editor and add following code.

var newfont = {
src: 'http://files.googlepages.com/Dynasty.swf'
};

sIFR.activate(newfont);
sIFR.replace(newfont, {
selector: '.post-title'
,wmode: 'transparent'
,css: [
'.sIFR-root: { color: #333333; background-color: #f3f3f3 ;}'
,'a { text-decoration: none; }'
,'a:link { color: #0000FF; }'
,'a:hover { text-decoration: underline; }'
]
});

Change url of font (text with red color) to url of yours. Look at selector tag, this should be the same as class name on sIFR-screen.css. You can change appearance style of your sIFR on css section (text with green color).


Upload sifr.js and sifr-config.js to your hosting server when you're done with editing.

Edit Blogspot layout
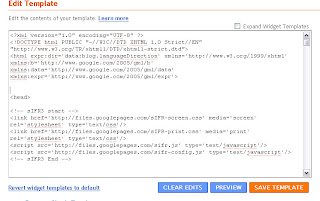
Login to your blogspot account and go to Layout and then click on Edit HTML. Add the following codes on header section (Bellow <head> tag).

<!-- sIFR3 start -->
<link href='http://files.googlepages.com/sIFR-screen.css' media='screen' rel='stylesheet' type='text/css'/>
<link href='http://files.googlepages.com/sIFR-print.css' media='print' rel='stylesheet' type='text/css'/>
<script src='http://files.googlepages.com/sifr.js' type='text/javascript'/>
<script src='http://files.googlepages.com/sifr-config.js' type='text/javascript'/>
<!-- sIFR3 End -->

Change url of sIFR3 files to url of yours (text with red color), click preview to see the result (Tips: Try view your result using Firefox or IE, Opera will not give you any good result because it doesn't support sIFR). If everything is OK you can save template and repeat those steps to your main blog.


Remember to backup your main template before implementing this steps to your main blog, just in case if you have a problem with it and you can restore it in any time. One more, do not copy and paste above codes without editing the red colored text (files URL), because those are just examples, your sIFR3 will not working if you still use those URL.
Read rest of entry

putting animated favicon in blogspot

it's about changing default blogger Favicon with static icon designed with gimp. With the same way we can change this static Favicon to animated.


The code is the same with static Favicon except the ICO files is replaced with animated GIF files. You can design it your self and upload to your file server and put the GIF links to Favicon code.
<link href='http://hosting.com/url_to_your_animated.gif' rel='SHORTCUT ICON'/>
just put this green color code among the <head> tag
Read rest of entry

Automatic Thumbnail and Readmore Function

Readmore function is used to cut our post on homepage, post will appear fully when we click readmore link. You can see my post on homepage. It's cut automatically and if we insert image, it appears thumbnail. This is automatic readmore function with thumbnail. We just need to set up our HTML code. How to?

1. Go to "Layout" click "Edit HTML"
2. Tick on "Expand Widget Templates"
3. Find </head> code
4. Insert this javascript under </head> code

<script type='text/javascript'>var thumbnail_mode = "no-float" ;
summary_noimg = 430;
summary_img = 340;
img_thumb_height = 100;
img_thumb_width = 120;
</script>
<script src='http://cebong.ipit.googlepages.com/read-moreotomatis.js' type='text/javascript'/>


Note :

You can cutomize this size

summary_noimg = 430; is post cut height without image
summary_img = 340; is post cut height with image
img_thumb_height = 100; is thumbnail image height
img_thumb_width = 120; is thumbnail image width

5. Find this code

<data:post.body/>


6. Replace with this code below

<b:if cond='data:blog.pageType != "item"'>

<div expr:id='"summary" + data:post.id'><data:post.body/></div>
<script type='text/javascript'>createSummaryAndThumb("summary<data:post.id/>");</script>
<span class='rmlink' style='float:right;padding-top:20px;'><a expr:href='data:post.url'> read more “</a></span>

</b:if>
<b:if cond='data:blog.pageType == "item"'><data:post.body/></b:if>


7. Save


Now you can try to post and it cut automatically.
Read rest of entry

Post your articles via email

Or how to post using mail.yahoo.com or gmail.com ?

1. Login into your blogger account.
2. Click on “Change Settings” icon of your blog.
3. Open ” Email” tab (see picture) -> blogger-how-to.jpg

4. Enter your Secret Mail-to-Blog word (see picture) -> secret.jpg
If you want to publish automatically don’t forget to check it.

5. Click “Save Changes”.
6. Login into your email account, write your post ( email Subject will be post Title and email body will be your post), sent it to
youbloggeraccountname.SECRETWORD@blogger.com.

Read rest of entry
 

WEB CREATION Copyright © 2009 Blog is Designed by Suvanno Tharu Sponsored by Hitsweb Pvt.Ltd